To connect your JobAdder and MyHR accounts we use a 3rd system Zapier, both JobAdder and MyHR have built Zapier apps.
Connecting JobAdder to Zapier and MyHR to Zapier means setting up a Zap with a JobAdder Trigger and MyHR action. There are 2 parts to this set up one in MyHR and one in the Zapier.
If you already have the connection set up see How to Edit your Draft People and How to Confirm Draft People.
WATCH: How the integration works
READ: Part 1 - How to set up a Zapier integration in MyHR
READ: Part 2 - How to connect your JobAdder account to your MyHR account
READ: Example of data mapping between JobAdder and draft person in MyHR
READ: Zapier integration functionality and status
How the integration works
The JobAdder to MyHR integration allows you to transfer applicant information you've collected during the recruitment process into MyHR as a draft person record.
Once you have a draft person in MyHR you can add any extra information that is required to confirm the person which will send a request to MyHR to create an employment agreement or contract, as well as allowing you to request support from the MyHR team for that person.
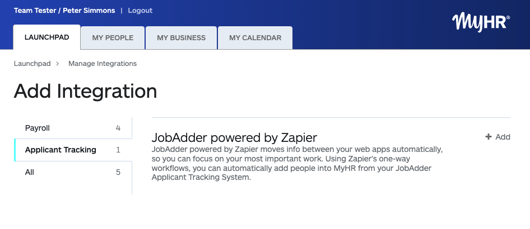
Part 1 - How to set up a JobAdder powered by Zapier integration in MyHR
- Select "Manage Integrations" from the menu

- Click "Add item"

- Click anywhere on the "JobAdder powered by Zapier" entry.
- Click "Authorise Zapier to access MyHR account".
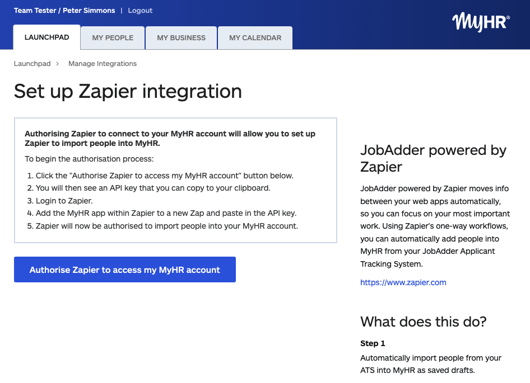
- You can now move on to Part 2 - How to connect your JobAdder account to your MyHR account

Part 2 - How to connect your JobAdder account to your MyHR account
In https://zapier.com we have Zap templates available which mean any "Placements" in JobAdder are sent through to your MyHR account to create a Draft Person.
- Select 'Connect JobAdder + MyHR' from the JobAdder to MyHR template to create a draft zap.
- Once your draft zap is available, in the trigger, Placements (new or status changes), connect JobAdder.
You will be asked to authorise the Zap connection to JobAdder. Click "Accept" to authorise the connection. If you are unsure seek advice from your IT / security professional but if you do not there will be no way to send JobAdder placements to your MyHR account.
- Once connected the account will show in the "Choose account" drop down.

- Choose when to trigger - select 'New Records Only' and continue.

- Test your trigger. Once you're happy, continue on to set up the Action that occurs when the Trigger occurs.

- Retrieve your API key to connect MyHR - sign in to MyHR (in a different tab) and then copying the API key that is available from your integration settings (see part 1, step 5).
- Connect your MyHR account to the action - in the action, Create AU Draft Person in MyHR, connect MyHR, select 'Sign in' and enter your API key and continue.


- Check the fields mapped and update any you might need to for your business.
- Test your action.
- Once you have both the Zap trigger and action set up it's time to switch on your Zap.
Draft people will be automatically created in MyHR once you make placements. When you get an alert about a new draft person, log in to MyHR, update and confirm the employee details to start accessing MyHR support relating to your new employee.
Example of data mapping between JobAdder and draft person in MyHR
When setting up your zap, you want to map as many fields as possible, which happens in step 8 of connecting JobAdder to your MyHR account. The following shows an example of which data fields to map between the two systems for NZ and AU draft people.
|
MyHR draft person fields |
MyHR field description |
JobAdder fields |
|
First Name |
Candidate - First name |
|
|
Last Name |
Candidate - Last name |
|
|
|
Canddiate - Email |
|
|
Gender |
||
|
Title |
Canddiate - Salutation |
|
|
Phone Number |
Candidate - Mobile |
|
|
Street address |
Candidate Address - Street |
|
|
Suburb |
Suburb or second line of address. |
Candidate - Suburb |
|
City |
Candidate Address - City |
|
|
State (AU only) |
State (abbreviation, e.g. "NSW") |
Candidate Address - State |
|
Postcode |
Canddiate Address - Postal Code |
|
|
New or existing |
Choose "existing" if you are entering a person that is already employed with you. You can default this one to ‘New’ in your Zap |
|
|
Start date |
The employee's first day of work and the date this agreement comes into effect. |
Placement Start Date |
|
Contract start date |
The date the contract comes into effect. |
Placement Start Date (Use this field if the contract and placement start date will always be the same.) |
|
Visa type |
For example, 'Student'. |
|
|
Work visa expiry date |
||
|
Birth date |
||
|
Job description - Job title |
Job Title |
|
|
Job description - Job purpose |
A 1-2 sentence statement that sums up the main purpose of this job. Simple is better. |
|
|
Job description - Job specific duties |
The work done by the person in this job, it includes their responsibilities and can also include decision making authority. The quality of the input here will help with job clarity for the person. |
|
|
Job description - Job education |
||
|
Department |
||
|
Manager name |
Onboarding Managers - First Name, Onboarding Managers - Last Name |
|
|
Manager title |
Onboarding Managers - Position |
|
|
Type of employment |
Placement Type |
|
|
End date |
This is the date the fixed term employment ends or is anticipated to end. |
Placement End Date |
|
Reason for fixed term |
The reason the term is fixed rather than permanent. |
|
|
Maximum weekly hours of work |
Maximum number of hours worked per week. |
|
|
Weekly hours of work |
Contact Rate - Hours Per week |
|
|
Pay type |
Values are: annual_salary, weekly_wage, hourly_wage |
Payment Type |
|
Pay rate |
Dollar amount of pay |
Salary - Total |
|
Pro-rata |
Is the person’s salary pro-rated from a full time salary. Values are: false, true |
|
|
Pay period |
How often does the payment occur. Values are: weekly, fortnightly, monthly |
|
|
Pay day |
For example, this could be a day of the week. |
|
|
Other pay or benefits |
This can include an annual bonus, company car, mobile phone with personal use or anything over-and-above the salary or wage. |
|
|
Notice period |
This is the amount of notice that an employee must give if they resign, it is also the amount of notice you must give in some cases of termination, other than summary dismissal. |
|
|
Primary work location |
Address or city where the employee will mostly work. |
|
|
Collective agreement |
Is the employee part of a collective agreement. Values are: false, true |
|
|
Trading name |
For example, a contractor's company name. |
|
|
Bank name |
Name of the employee's bank for payment. |
|
|
Bank account number |
Employee's bank account number for payment. |
|
|
Bank account name |
Name on the employee's bank account. |
|
|
Emergency contact name |
||
|
Emergency contact relationship |
For example, 'spouse'. |
|
|
Emergency contact daytime phone |
||
|
Emergency contact after hours phone |
||
|
Additional information |
For anything else that has not been already included. This might relate to previous history, any special considerations for this employee etc. |
|
|
Self-service |
This will enable the employee to use MyHR to view and e-sign their employment agreement, use the online leave scheduling tool and performance management module. To enable self-service we require a unique email address for each employee. Values are: false, true |
|
|
Performance reviews |
Whether the employee will have performance reviews (defaults to yes). Values are: false, true |
|
|
Leave enabled |
Whether the employee can request leave (defaults to no). |
|
|
Employment state (AU only) |
Employment state (abbreviation) if different from address |
|
|
IRD number (NZ) / Tax file number (AU) |
||
|
Tax code (NZ) / Tax scale (AU) |
||
|
Contractor business number (AU only) |
Contractors only |
|
|
Tax-free threshold claimed (AU only) |
Has the person claimed the tax-free threshold for this employment Values are: false, true |
Getting help with Zapier
The MyHR Zapier app is available on Zapier.com along with templates for an integration between JobAdder and MyHR. If you need any help, contact our customer success team.